When you buy a new laptop or a desktop, first thing you would probably want to do is to partition your hard disk as the default partitioning will have only one or two drives in Windows. Similar to Windows 7, the partitioning options in Windows 8 are also very much similar and comes with only basic options. But even with the tools available in Windows 8, you can do partitioning of your hard drive. To start with the hard disk partitioning, you need to open the computer management section. To do this, you can either type the command compmgmt.msc in run command (Win key +R) and press enter or use the control panel to navigate (Control Panel-> All Control Panel items-> Administrative tools-> Computer Management).
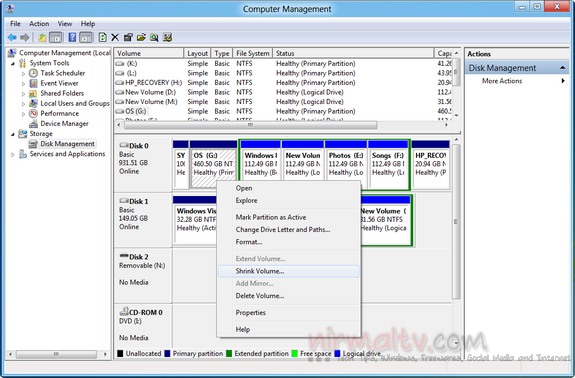
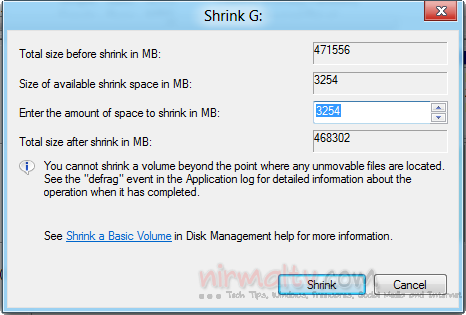
In the computer management, select disk management under the storage option. Here you can find the hard disk connected to your PC. You can right click on any of the current partition and select Shrink Volume. Shrink volume will determine the amount of space that can be shrunk to get the space for new volume. The amount of space available for shrinking is not equal to amount of free space as it depends on the file positions and amount of clusters on your hard disk.
Once the amount of space available for shrink is determined, you can select the amount of space you want for the new partition. Once the shrinking operation is complete, you can see unallocated space right next to the volume which was shrunk. Right click on this unallocated space and select create new partition. This will create your new partition with the amount of space you allocated. You can do a quick format of the new partition and start using it.
You can create multiple partitions using this shrink feature, but please not that once you start using the hard drive, amount of space available for shrink might get reduced due to clustering. So it is advisable to do the partitioning at the start of usage of your new PC.
Related Reading: Create, Shrink, Extend and Resize Disk Partitions in Windows 7- Detailed Guide.

