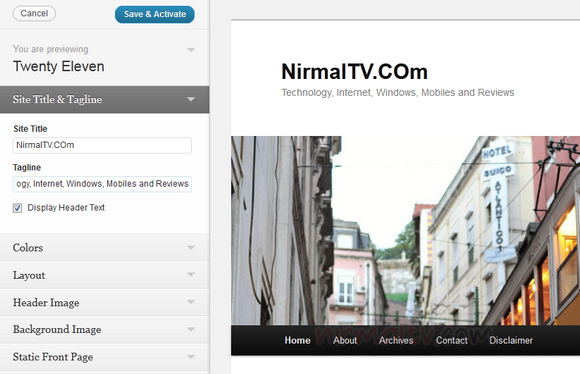
WordPress released the latest version 3.4 yesterday with some major changes and improvements. One of the main new addition is the availability of theme customizer. Theme Customizer is a new feature which allows users customize the theme options before activating a new theme. The theme customizer has options like colors, background, header image, post formats and post thumbnails. The default themes available in WordPress which includes Twenty Ten and Twenty Eleven are enabled for this features.
But most of us do not use the default theme and we have our own custom themes or premium themes purchased. Not all of these themes have all the them customization options available. Although Site title and tagline, static front page and also navigation are available for all themes, changing colors, background and headers are not available unless these functions are available in the theme.

The Theme Customizer allows you to change the following settings:
| Site Title & Tagline | This feature allows you to change your Site Title along with the site Tagline. |
|---|---|
| Header | Inside the header you can change
|
| Background | Under Background, you can adjust both the background color and the background image. |
| Navigation | Navigation allows you to choose your Primary Menu |
| Static Front Page | Under Static Front page you can choose whether your front page shows your latest posts or a static page you’ve created. |
How to Enable the Theme Customizer on your Theme:
To enable these features, you need to add the hook to functions.php file in your theme.
<?php add_theme_support( $feature ); ?>
Here $feature includes;
- 'post-formats'
- 'post-thumbnails'
- 'custom-background'
- 'custom-header'
- 'automatic-feed-links'
We will discuss how to enable custom background and custom header options.
1. Custom Background:
To enable this feature you need to add the below hook to your functions.php file inside the theme.
add_theme_support( 'custom-background' );
Note that you can add default arguments using:
$defaults = array(
	'default-color'          => '',
	'default-image'          => '',
	'wp-head-callback'       => '_custom_background_cb',
	'admin-head-callback'    => '',
	'admin-preview-callback' => ''
);
add_theme_support( 'custom-background', $defaults );
You can pass parameters like color, image etc. Here is an example using default ‘#000000’ background color with ‘background.jpg’ background image:
$args = array(
	'default-color' => '000000',
	'default-image' => get_template_directory_uri() . '/images/background.jpg',
);
add_theme_support( 'custom-background', $args );
2. Custom Header:
To enable custom header via the theme customizer, you need to add the following hook to functions.php file.
add_theme_support( 'custom-header' );
Note that you can add default arguments like default image, height, width etc using:
$defaults = array(
	'default-image'          => '',
	'random-default'         => false,
	'width'                  => 0,
	'height'                 => 0,
	'flex-height'            => false,
	'flex-width'             => false,
	'default-text-color'     => '',
	'header-text'            => true,
	'uploads'                => true,
	'wp-head-callback'       => '',
	'admin-head-callback'    => '',
	'admin-preview-callback' => '',
);
add_theme_support( 'custom-header', $defaults );
Here is an example usage which has a default header image 980px width and 60px height:
$args = array(
	'width'         => 980,
	'height'        => 60,
	'default-image' => get_template_directory_uri() . '/images/header.jpg',
);
add_theme_support( 'custom-header', $args );
Finally you need to update your header.php file to:
<img src="<?php header_image(); ?>" height="<?php echo get_custom_header()->height; ?>" width="<?php echo get_custom_header()->width; ?>" alt="" />
Once you have done these, open the theme customizer. To do this go to WordPress dashboard and select Themes from Appearance. Against all the themes, you can see a link Live preview, click on it and you get the theme customizer with the option.

For more details, you can check the WordPress Codex site.


