The File Explorer or Windows File Manager is one of the most important aspects of any Windows version as it is the one used for managing your files. The File Explorer in Windows 11 has improved compared to the previous version and now it is more refined and also comes with better features. Sometimes, you might need to run File Explorer as administrator mode with more privileges. So how do you do that? Let’s find out in this article.
How to Run File Explorer as Administrator:
By default, when you open File Explorer in Windows, it opens with standard privileges. This works only if you are a part of the administrator group or your account is an administrator. So in order to do this, first open the File Explorer.
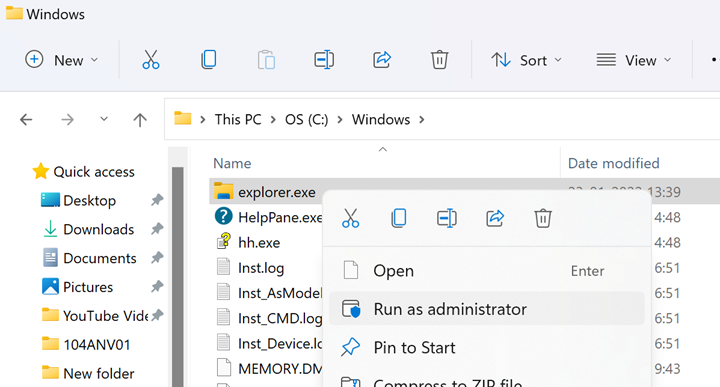
Now in the address bar type C:\Windows and press enter. This will take you to the Windows folder in your drive. This is assuming that you have installed Windows on a C drive. Here you need to search for the Explorer.exe file, which is listed in this folder.
Once you see the explorer.exe file, right-click on the file and you will see an option to run the File Explorer as administrator.
Now, when the File explorer opens, it will be in administrator mode.
Alternatively, you can also run from the Task Manager in Windows 11. Open the Task Manager in Windows 11. For this you can either use CTRL + SHIFT + Esc or use CTRL + ALT + DELETE to open the task manager.
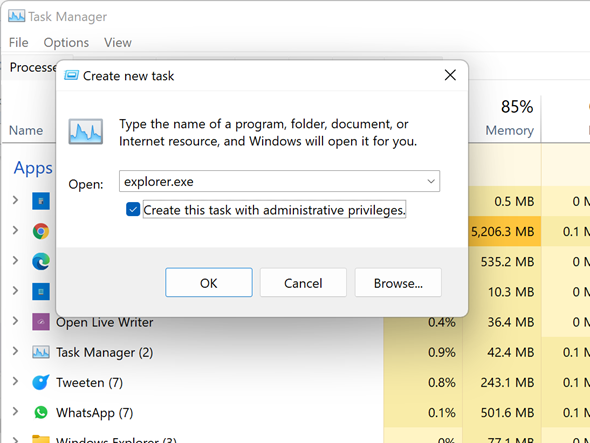
Once the task manager is opened, click on the file menu and select Run new task. Here you need to enter explorer.exe as the new task and you will also see a check box below it which says “Create this task with administrator privileges”
Now click ok and you will see the File Manager open and this will have administrator privileges.


